
Whether you're an expert, or this is your first attempt at creating a pixel (an image created by painting each pixel), this is a fun image to create! Watch for the next froggie tutorial that will help you pixel paint a jumping frog and animate it by combining it with the sitting froggie you'll create in this tutorial.
This tutorial is best viewed at a screen resolution of 1024 x 768 or larger. If you're using Windows you can adjust your screen resolution by minimizing all windows and right clicking on your desktop. Choose Properties on the shortcut menu, and select the Settings tab. Slide the screen resolution arrow until it reaches 1024 x 768 then choose ok. If after adjusting your screen resolution the text in your browser window is too hard to read, select the View menu and choose Text Size. Then you can try out various sizes to see what works best for you.
Keyboard short-cuts will be displayed in parenthesis. I hope you like them and enjoy using them, if not then feel free to ignore them. Personally, I like to memorize keyboard shortcuts, but I find it easier to learn a few at a time. One way to do this is to make a sticky note listing the shortcuts you most want to learn and place it within easy view. Then every time you perform one of the actions the shortcut on your list will replace, look at your note and use the keyboard shortcut instead. Before you know it you'll have all the shortcuts on your sticky note memorized and you can create a new one with more shortcuts to learn.
This tutorial was written for beginners to Paint Shop Pro (PSP). If you don't have PSP then you can download a free 30 day trial by clicking here.
Open PSP and start by creating a new image (ctrl + n) with the following specifications:
|
We'll actually be making the image transparent, but by creating a white background it will make it easier to see where to place your pixels.
The image size is one pixel bigger than the image we'll be creating so when you start pixeling remember to leave one blank pixel all the way around your image. I personally think it's easiest to start drawing the image in the bottom left corner (because the frog's toe is closest to both the bottom and a side so it require's less counting in from the edges).
The first thing we'll draw is the left half of the outline for the frog's body. I used dark green (#294935), the first color on the pallete below.
An easy way to select the color you need is to click on the color palette below, a new window will open where the right click option is available. In the new window, right click on the image, select copy, toggle (alt + tab) to PSP and paste (ctrl + v) it as a new image. You could also save the palette if you prefer to have a copy to keep for later. Then select your paintbrush tool (b), hover your pointer over the color you want, hold down the control key and the eye dropper tool will temporarily appear so you can select the color by clicking on it.
Choose the square01 brush tip with the settings below.

I find it easier to count my pixels when I view the grid. To do this select the view menu and choose "grid" (ctrl + alt + g). I also adjust my grid settings by choosing the view menu and selecting "change grid, guide and snap properties...". In the dialogue box I select one pixel each for horizontal and vertical grids on the current image. I also zoom in to about 2000% (use the Overview palette or the roller on an inteli-mouse).
Create a new raster layer, and name it body outline. Pixel the outline shown below by counting in and up from the bottom left corner.
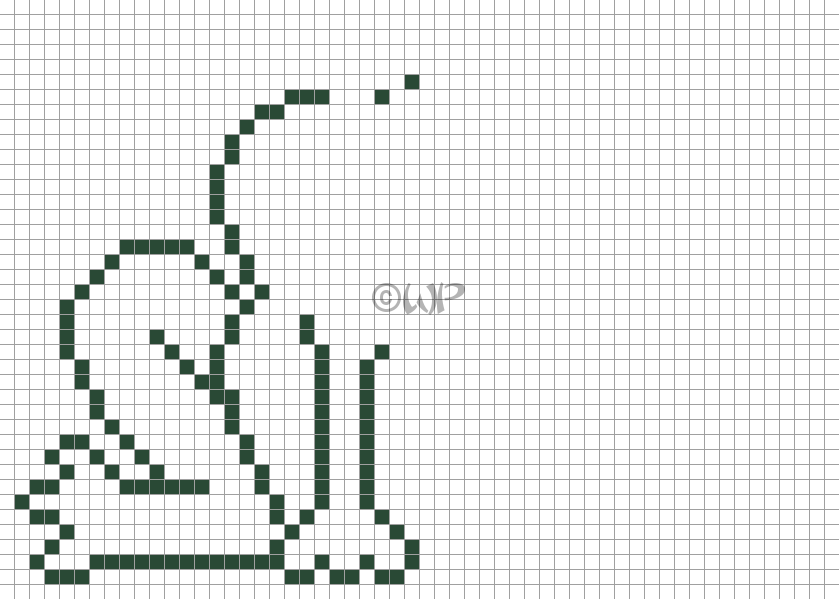
Don't forget to save (ctrl + s) your file frequently so you reduce the chance of loosing anything you've already completed.
Duplicate your body outline layer, and mirror it. Right click on the copy of body outline layer and select "merge, down". Your body outline layer will now have a complete frog body. (Click here for detailed instructions.)
Create a new raster layer and name it spots. Now you can pixel the spots shown below in the same color as the body outline. I dimmed the body outline to emphasize the spot placement so your colors won't look the same as mine do below.
If you're feeling creative pixel them in your own choice of size and shape. When I'm experimenting I usually do it on a new layer so I don't worry about damaging anything I've gotten done that I really like. So that is why I had you create the spots layer. If you get a pixel somewhere you don't want it you can always erase it. Just select your eraser tool (x) and choose the same settings you used on your paintbrush. Then click on the pixel you'd like to remove.
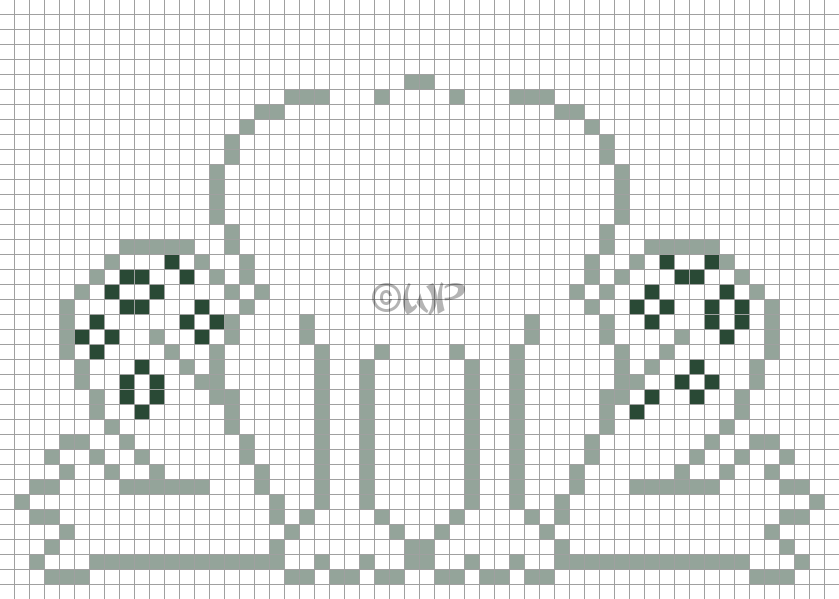
Select the second color on the color pallet (#4C8A63) and color in the spots. Select the body outline layer. Select black (#000000), and pixel the eyes and face as shown below. Then select white (#FFFFFF), and fill inside each eye (you may have to hide the background layer to see what you're doing in this step - just click on the eye next to the background layer to hide it).
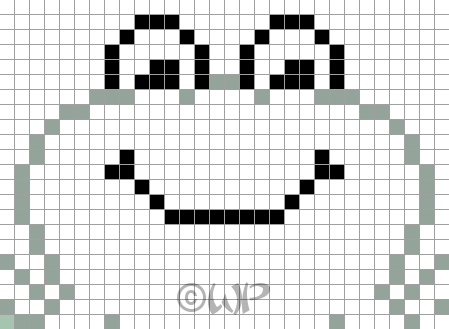
If you want to keep a blank copy of the outline you created for future recoloring then duplicate the body outline layer and name it finished body. Then drag it down so it it under the body outline layer. I keep my outlines in colored files, but if you prefer to do differently you can easily make a copy of this file by holding down the shift key and typing the letter d (just make sure you don't have your text tool selected or it will just type a capital D).
Now to color the body go to your original file and select the finished body layer. Select the flood fill tool (f), and select the third color on the color palette (#75EDA2). Fill in the rest of the body and each of the legs by clicking in a blank spot inside your outline. Now all we have left to do is the shading and highlights.
Create a new raster layer called highlights. The first part of the highlights we'll do are the tummy. Select the fourth color on the color palette (#C6F4D7) and use the paint brush tool (b) to color in the darkened tummy area in the picture below. (To make it easier to see what area you need to color in I darkened the tummy area on the example below.)
Hint: One thing I do when I'm coloring pixels that are in straight lines is to use what I call the start to finish method. I start by clicking on the first pixel in the row, I then release the mouse and hold down the shift key while moving over the last pixel and clicking. What this does is fill in all the pixels between the first pixel and the last pixel in the row. This way I don't have to click on each pixel individually, or drag and risk filling extra pixels if my hand wobbles while dragging.
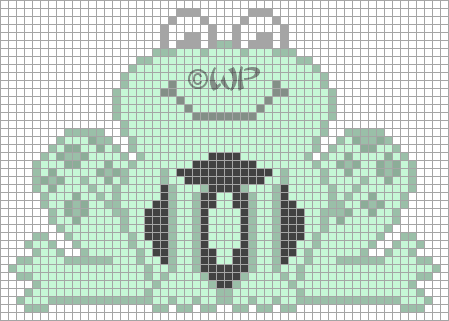
Now fill the area in the middle of the tummy with white (#ffffff). Once that's done select the fifth color on the color palette (#B7F3CE) and use the paint brush tool (b) to color in the cells under the eyes in the image below. (I've darkened them again to make it easier to tell which pixels to fill.)
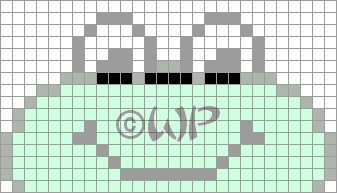
Select the sixth color on the color palette (#D8F8E4), and use the paint brush tool (b) to color in the highlights on the toes as shown below.

We'll now add some shading to the highlights layer. Select the second color on the color palette (#4C8A63), and use the paint brush tool (b) to color in the bottom row of pixels above the outline of the feet as shown in the picture below. After that select the seventh color on the color palette (#59A174), and color the row above the last row you just colored as shown in the picture below.

The final step in shading our frog is to accent the cheeks. Select the second to last color in the color palette (#C07EA6), and use the paint brush tool (b) to color the pixels closest to the smile lines. Then select the last color on the color palette (#DAB2CB) and color the remainng pixels in the image below.
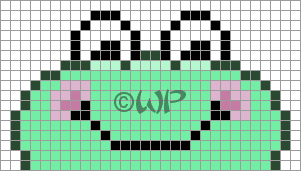
If you want your image to all be on one layer then now is a good time to merge all. Be sure to hide the background layer so your image will be transparent, and then right click on one of the visible layers and select Merge Visible.
Make sure you save your file now, and add your watermark (a way of signing your work). I always add my watermark on a new layer. Please don't add the copyright to your watermark on this image, but you can add your initials.
At this point you'll probably want to export the file to GIF Optimizer (choose File, Export, GIF Optimizer). This will help make it a smaller file type and more accessable. Prior to optimizing you need to decide if you want to display the background or hide it. You could also make it a different color and use that color in your transparency settings. The choice you make will help determine your settings in the optimizer.
If you hid the white background layer you can choose Existing image or layer transparency on the Transparency tab. On the Partial Transparency tab I selected Use full transparency for pixels below 1% opacity and No, use the existing image color at 100% opacity, but it really doesn't matter what you select if you've colored your image the way I outlined because nothing is semi-transparent.
I set my Colors at 15 with no dithering, and used an Optimized Median Cut method of color selection on the Colors tab. I chose Non-Interlaced on the format tab. One last hint that you may find helpful is to name your file something without any spaces. It helps later when using the image on the internet. (Dashes and underscores can be used to separate words.)
You can use this frog in creating sig tags, but please don't make a profit from them (even if you change the color or modify the pixels). Please read the full terms and conditions of use before using your new image.
Thanks for taking the time to do this tutorial and I hope you were able to learn some new things and enjoy yourself while doing it. I'd love to see your work so feel free to me a link to where you have yours posted. If you'd like a free spot to save your images some of my favorites are www.tinypic.com and www.photobucket.com.
If you'd like to animate your new froggie to jump check out the next frog tutorial at Pixel Froggie - Jumping.
Ribbit!  Happy frogging!