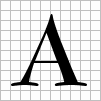


In the example below Figure 1 is 101 pixels wide by 101 pixels tall. The letter A was typed in a 72 point font using the BernhardMod BT font face. Figure 2c was created by resampling Figure 1 to 125% of it's original size which resulted in an image 126 pixels wide and 126 pixels tall. Figure 3c was created by resampling Figure 1 to 200% of it's original size which resulted in an image 202 pixels wide by 202 pixels tall.
Below I have displayed all three images at their default resolution of 72 ppi. Notice how Figure 2c has a slight blur. Figure 3c is quite blurry and upon close examination pixelation is even visible in various places.
Figure 1 |
Figure 2c |
Figure 3c |
Each of the images below is displayed at double their normal size to emphasize the decrease of image sharpness. Figure 1d is sharper than the other two images with Figure 3d appearing very blurry.
Figure 1d |
Figure 2d |
Figure 3d |
While resampling can be used to increase the size of an image, typically it is best to create images in the size in which they are intended to be used. If you need to resample to enlarge an image, it is usually best to only increase the image 25% by resampling. I have had better results when I start with a larger image and resample down to the needed size, and I usually prefer not to resample down more than 50%. It is also a good rule of thumb to only resample an image once. If you find your results aren't what you want, undo, adjust the settings and try again.
For more information on resampling go to the full answer to What is resampling and how does it work with resizing?